Vscode配置LaTeX代码片段
在使用LaTeX书写论文时,每次从文件中复制代码段无疑是不优雅的,那么如何才能更加方便快捷地重复使用大段LaTeX代码呢?我们可以利用Vscode自带的用户片段功能。
用户片段功能在哪里?
在文件->首选项->用户片段里打latex,即可打开latex.json文件,在这里面就可以书写用户片段啦
用户片段的基本格式
基本格式
1 | "Print to console": { |
用户片段用json来书写,主要包括以下部分(主要来自参考文献3的翻译):
- 片段名称:即
Print to console。 - 触发词(prefix):我们可以通过prefix定义一个或多个显示代码段的触发词。即上文的
log。 - 主体(body):是一行或多行内容,在插入时将作为多行连接。将根据插入代码段的上下文对分隔符和嵌入选项卡进行格式化。也就是最后实际显示在编辑器中的内容。
- 描述(description):是对显示的代码段的可选说明。即
Log output to console。
书写的注意点
-
在使用到反斜杠时,需要写
\\,最终在编辑器中显示为\ -
body可以使用特殊构造来控制游标和要插入的文本- **按下Tab键后停止的位置:**使用Tab键,我们能够让编辑器的光标在显示的代码段中移动。使用
Tab指定光标位置。数字(如$1,$2)是将访问选项卡停止的顺序,而$0表示最终光标位置。如果有同一编号被使用多次将会同步链接更新。值得注意的是这个数字大于等于10也是可行的。 - **占位符:**复杂的代码片段会使用到占位符,占位符形如:
${1:xxx},${2:xxx}, …, 顺序按照数字顺次排列,每个占位符中的xxx为占位符的实例内容,结束位置的占位符为$0。 - **选择占位符:**占位符可以选择在给定的范围内选择值。语法是将值用
,分隔枚举,与|一起括起来。例如${1|c,t,b|}即表示在1位置,可以选择c,b,t三种选项,分别对应垂直居中(center),底部对齐(bottom)和顶部对齐(top) - 其他的操作都可以在Vscode官网上找到。
- **按下Tab键后停止的位置:**使用Tab键,我们能够让编辑器的光标在显示的代码段中移动。使用
书写论文用户片段的基本案例
latex.json文件
下面给出的案例均来自于对论文常用代码的改写。主要包括
- 单图:用
image,\image呼出 - 多图
- 子图格式:
images_sub,\images_sub - 全图格式:
images_minipage,\images_minipage
- 子图格式:
- 普通三线表:
table,tabular,\table_tabular - 代码
- 代码段:
code,\code - 代码文件:
codefile,\codefile
- 代码段:
- 【新增】beamer中常用的左图右文
上述这些是我觉得比较实用的一些内容,所以就做成了用户片段,能帮助我们迅速完成图片、表格、代码等的插入。
1 | { |
使用方式
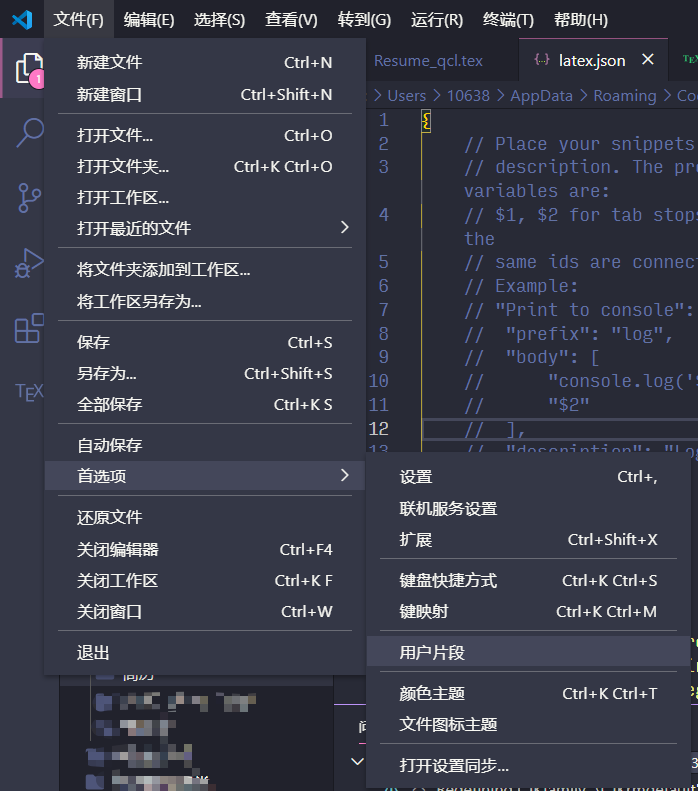
-
输入触发关键词,例如
image![ex1]()
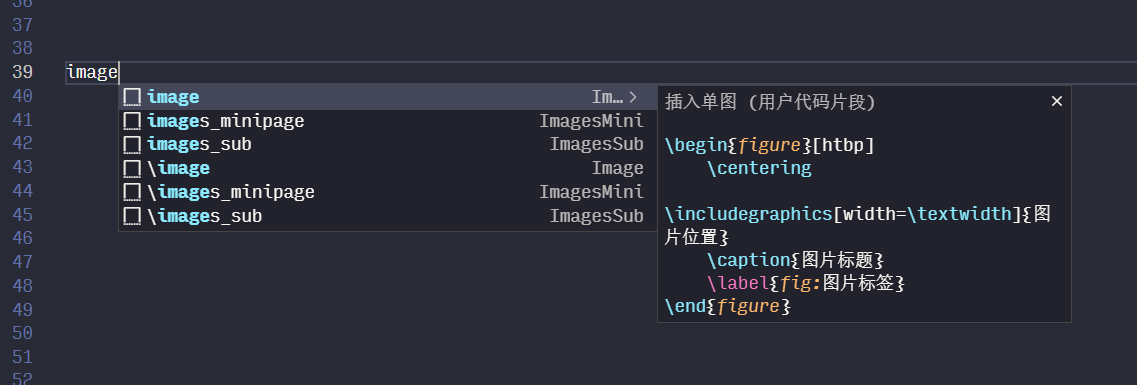
-
利用
↑,↓键选择对应的用户片段,按Enter键选中片段![ex2]()
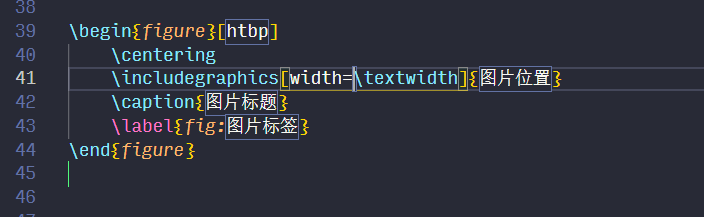
-
在光标跳动位置输入正确的内容,按
Tab键移动到下一个占位符处,再次输入,以此类推,直到写完所有内容。![ex3]()

参考文献
-
VScode配置latex+代码片段让写作起飞. https://blog.csdn.net/cfunction/article/details/108591734
-
VSCode插件开发:LaTeX Snippets. https://hexo.gyrojeff.moe/2020/03/04/VSCode插件开发:LaTeX-Snippets/
-
Snippets in Visual Studio Code. https://code.visualstudio.com/docs/editor/userdefinedsnippets